
One of my favorite parts of the festive season is getting creative with décor. You can pop into a store and find thousands of adorable pre-made ornaments, but there is something different about making them from scratch. Plus, when those decorations are as simple and cost-effective as paper snowflake ornaments, it’s hard to resist trying them out.
I’m sure many of us remember cutting out classic two-dimensional paper snowflakes as kids. This project takes that familiar feeling to the next level, with a bit more depth and sophistication.
3D paper snow ornaments create a bigger visual impact than their flat counterparts, and they are easy to customize to suit your existing décor or Christmas color scheme. If you’re up for a little crafting that recaptures the magic of those childhood snowflake-making days (but with a modern twist), this tutorial is the one for you.
Crafting Paper Snow Ornaments

If you’ve ever made paper snowflakes before (even the simple kind you learned as a child), you already have a basic idea of what we’re going for. The difference here is that we’re going three-dimensional, layering to form a shape that looks good from all angles.
3D ornaments feel more substantial than hanging single pieces of paper. As they twirl in a light breeze or when you brush past your tree, they show off their patterns from multiple angles, catching the glow of twinkle lights or the morning sun.
Smaller versions of these snowflakes look stunning on a Christmas tree, while larger ones are great for hanging from your mantel or around your home. Hang a few in front of your windows to create a wintry feel, or create a festive centerpiece to place above your dining table. You can even mix and match different sizes and colors, layering them with greenery, pine cones, or other homemade ornaments. They’re quick enough to make in batches, so you can whip up a whole assortment without spending a fortune or filling your closet with plastic bins of store-bought ornaments.
You won’t need fancy tools or expensive materials to start: just paper, scissors, glue, and a bit of twine. It’s easy to buy decorations at the click of a button, but so much more satisfying to turn basic items into something beautiful you made by hand.
What You’ll Need

To get started, you’ll need just a few basic supplies you likely already have on hand:
- Paper: Choose something sturdy yet foldable. White paper works well for the classic snowy look, but you can also use patterned or colored paper for a unique twist. You can even use leftover wrapping paper, but I would avoid anything with heavy patterns or pictures, as they will be distorted once you actually make the snowflake.
- Scissors: A sharp, comfortable pair is best, especially if you plan on making several ornaments. For more intricate patterns, pick smaller scissors that you can maneuver easily for better control.
- Glue: A reliable craft glue or glue stick will securely hold your pieces together. A hot glue gun is also useful, especially when you’re attaching your twine loop at the end.
- Twine: This will be your loop for hanging. Twine has a rustic feel, but satin ribbon is just as pretty. Choose what fits your holiday style and the other décor you’re already using.
- Extras: Consider adding glitter or using decorative-edge scissors for a patterned cut to really personalize these ornaments.
Step 1
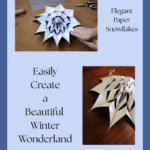
Start with a rectangular sheet of paper. Fold each short edge in toward the center so they meet neatly in the middle. If you need a guide, fold the paper in half first and open it up again so you know what middle line you’re aiming for. Then run a line of glue where they overlap. Allow it a minute or two to settle before proceeding.
Ensure you use strong glue to prevent the pieces from coming apart, as this will cause your snowflake to completely unravel later on. Good glue provides a strong base for your ornament and ensures the finished piece retains its shape.
Step 2
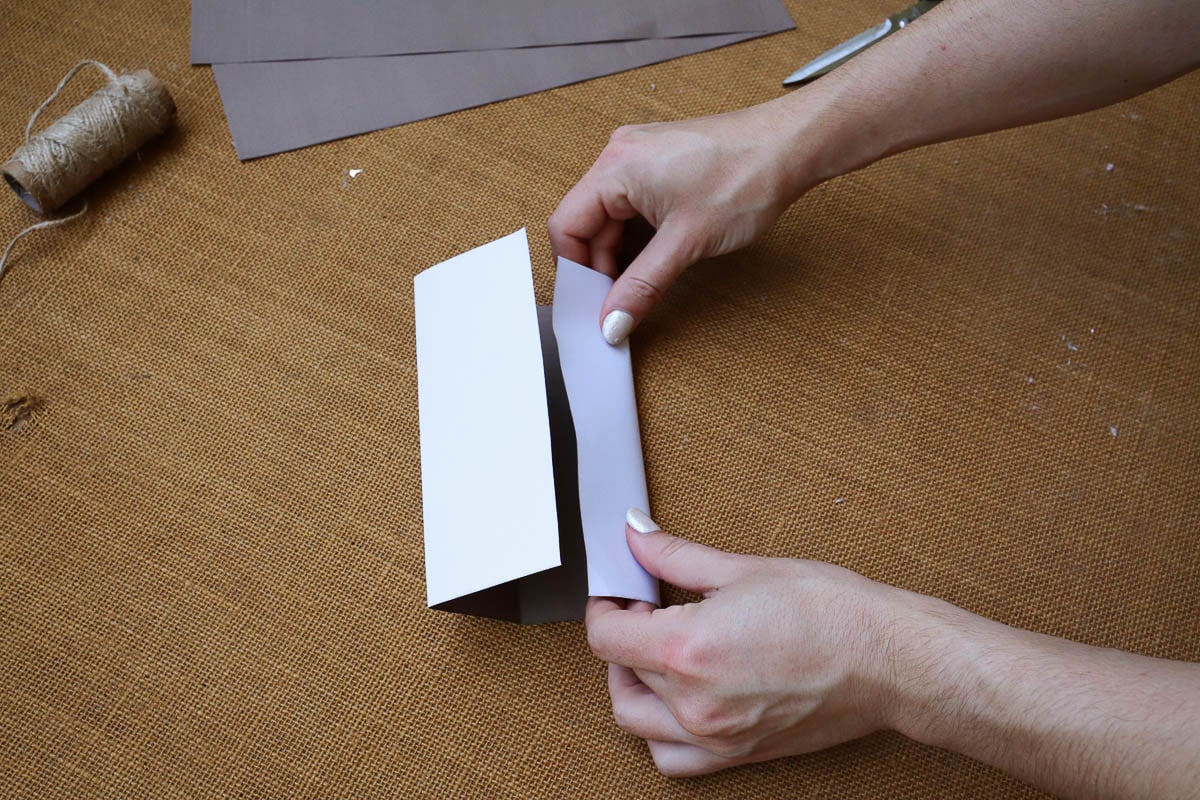
Keeping the glued line vertically in the center, trim off the top corners of one side to form a pointed peak. It will create a house shape, with a triangle at the top and a flat bottom (the glued line will run down the center).
Use your scissors to cut small patterns into both sides. The patterns should be symmetrical. Tiny triangles, half-circles, or slits on the edges will turn into pretty details once everything comes together.
Consider testing a few patterns before committing, especially if you’re going for a specific look. You’ll have to make these a couple of times, so also make sure it’s something you’re happy to replicate over and over.
Step 3

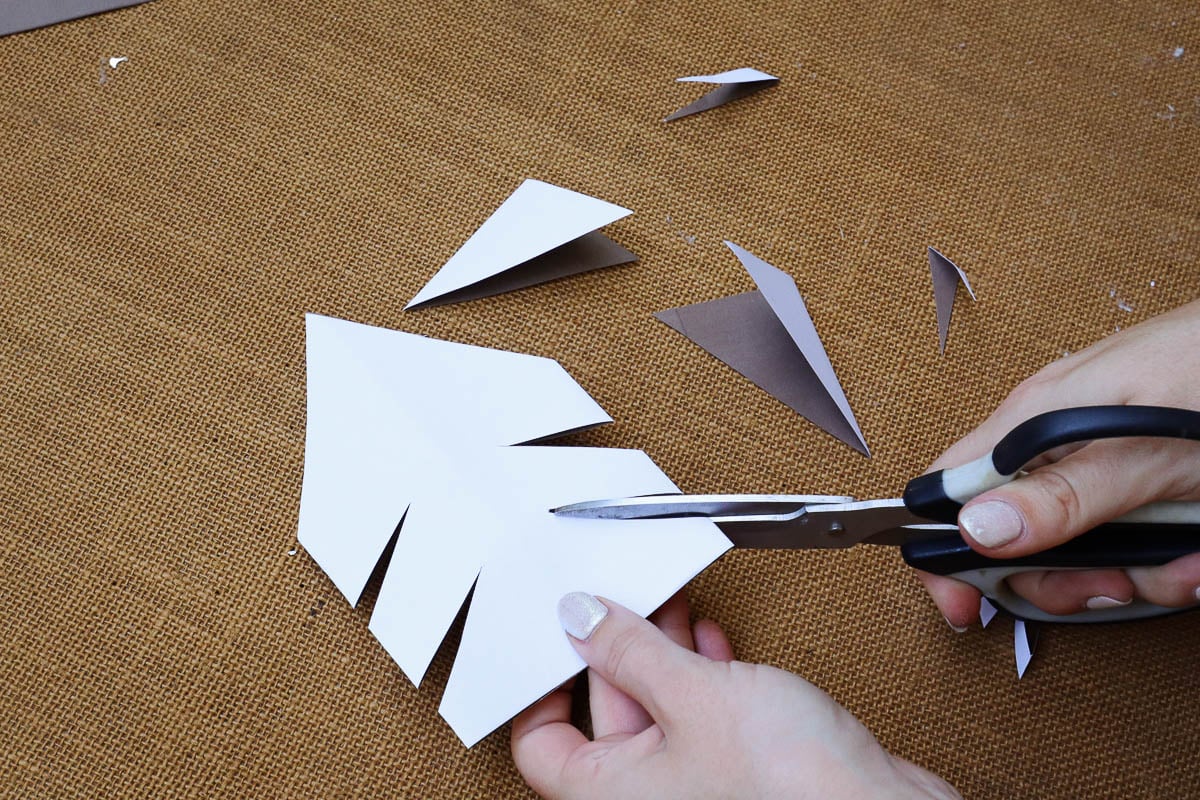
You’ll need about 8 to 12 identical house-shaped pieces for a full ornament. It may sound like a lot, but once you get going, it’s not too difficult. And I promise the result is worth the effort.
Repeat the folding, gluing, trimming, and pattern-cutting process until you have a small stack. Then, start gluing these pieces together, one against the next, along that vertical line in the center.
Step 4
Before closing up your ornament, take a length of twine or ribbon and lay it along your top layer along the center line. To create a loop, lay the two ends down the middle, leaving the excess coming out of the top of the triangle.
This will be hidden inside the ornament, so it doesn’t have to look perfect. Add a line of glue down the middle, preferably strong glue or hot glue for a good hold. Ensure the twine is securely in place before proceeding to the next step. You can test it by picking it up by hand and making sure it holds.
Step 5

Finally, bring the bottom and top layers together by folding them around in a loop. Glue them together with the twine between the two, forming a circular shape. Gently adjust the pieces as needed while the glue is still wet, ensuring everything lines up.
Once it’s dry, you’ll see the final 3D effect. As long as all the pieces are secure, your ornaments are ready to hang.
Decorating and Hanging

The shape of these snowflakes is what makes them shine, but you can always add a bit more decoration if you prefer. Brush the edges with a hint of glitter for a frosty sheen, or apply small gems to catch the twinkle of holiday lights. If you have some metallic paint pens, you can highlight a few of the cut-out shapes, giving the ornament a more polished finish.
When you’re done decorating, simply hang it in your chosen spot: on the tree, in a window, above a mantel, or anywhere you want a hint of holiday cheer. Experiment with different paper textures, colors, or patterns to create more variations. Before you know it, you’ll have a ton of ornaments to decorate your home without spending a cent.