Every year, I think about making a gingerbread house, and every year, I talk myself out of it. The whole process seems designed to test your patience. I have no time for assembling walls that refuse to stand up, or watching the roof slide off while the icing is still wet. It’s supposed to be fun, but for me, it’s mostly stressful.
Then I saw a wonderful idea online this year that I’m shocked I haven’t come across before: you could skip the baking entirely and use store-bought crackers or cookies instead, with a cardboard frame underneath for the structure part. I’m sure this is not news to most people, but I’ve only ever made traditional gingerbread houses the old-fashioned way, so it was definitely news to me.
Not only does this work, but it’s much easier and less frustrating than traditional gingerbread house construction. The cardboard frame eliminates all the structural anxiety, and using graham crackers or cookies means you’re decorating within an hour instead of spending half a day on prep work to bake your walls and roof from scratch.
What You’ll Need

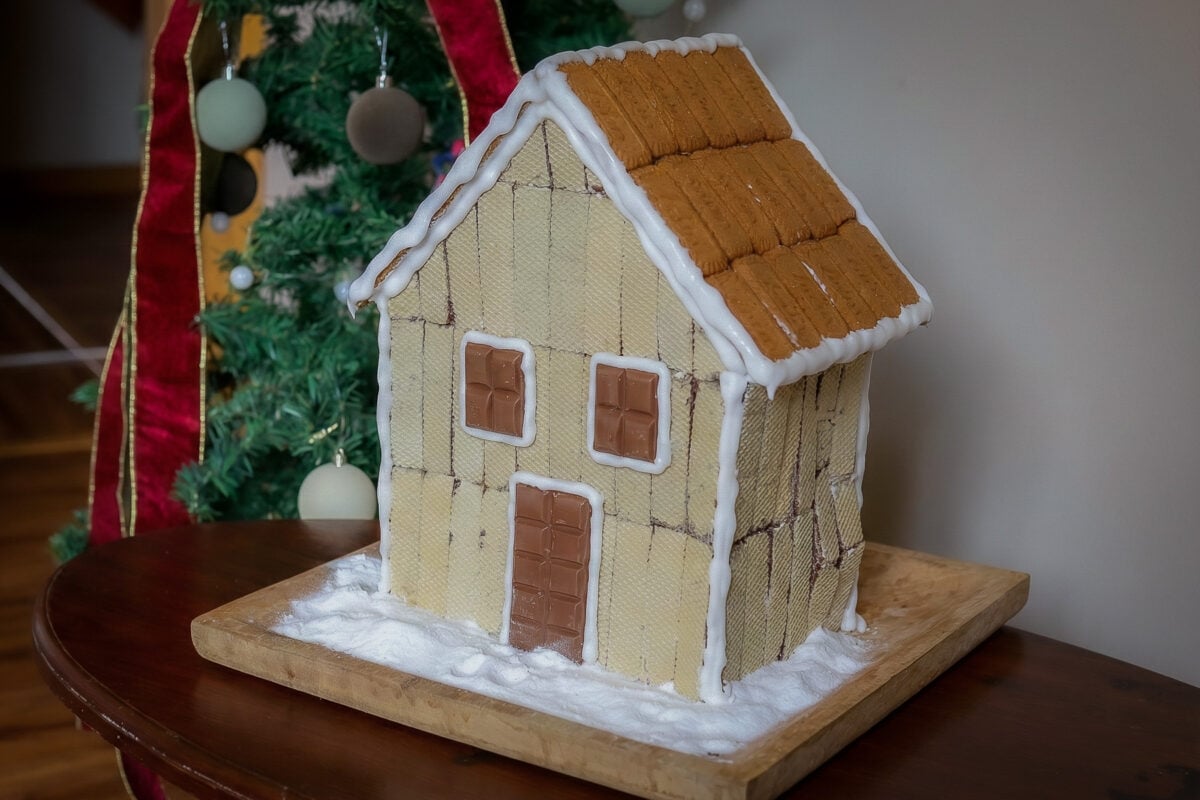
Graham crackers are the standard choice for this project because they’re flat and rectangular. I’m not a fan of these, so I combined my favorites: vanilla wafers and Biscoff. You may argue that these are not ‘gingerbread’ houses then because of the lack of ginger, but the result is much the same, and arguably, much tastier. Anything flat and sturdy works, but because of the frame element, you don’t have to value structure alone.
For the frame, raid your recycling bin. Small cardboard boxes, milk cartons, or juice cartons all work perfectly. I used the cardboard box my milk comes in for a double-story shape. You’ll cover these completely, so it doesn’t matter what they look like underneath. You’ll also need aluminum foil to wrap the frame, as this creates a surface that royal icing can grip.
Royal icing is your glue. Store-bought royal icing works fine and saves time. If you want to make your own, you’ll need powdered sugar, meringue powder, and water. The recipe is straightforward but adds another step.
Decorations are whatever you want, as with a regular gingerbread house. Candy canes, gumdrops, M&Ms, mini marshmallows, pretzel sticks, or sprinkles add a pop of color (anything edible and festive).
A piping bag or plastic sandwich bag with the corner cut off helps with icing application. Choose a wider nozzle for thicker icing drips or a thinner one for pointy drips like icicles. A butter knife works too if you’re not worried about precision, but it makes creating the snow drip lines pretty much impossible. Also, have a sturdy base ready for your finished house, like a cutting board or cake stand.
Step 1: Make a Frame

This is my favorite part of the whole process. Instead of trying to balance cookie walls that want to topple over with small crackers, you build around a solid frame that can’t collapse.
Take your cardboard box or milk carton and decide which direction you want it oriented. The box becomes the interior structure of your house, hidden under cookies.
Wrap the entire box tightly with aluminum foil, covering all surfaces. Smooth out wrinkles as much as possible (you can cover bumps with icing later, but they are hard to stick cookies to). The foil gives the icing something to stick to, and it creates a moisture barrier between the cardboard and the icing.
Once wrapped, your frame should look like a shiny metallic house shape. Sloppy wrapping works fine as long as the foil stays in place. If it moves around, whatever you stick to it will move around too.

Having this frame means you can press cookies onto vertical surfaces easily. And you can work on one wall while another wall sets. The whole process is assembly rather than full-on construction, which makes a huge difference when you’re working with no-bake, smaller-sized crackers. Problems with balancing can stack up fast otherwise. It’s like LEGO, but with cookies.
Step 2: Make Royal Icing

If you’re using store-bought, skip ahead.
For homemade royal icing, combine 4 cups of powdered sugar, 3 tablespoons of meringue powder, and about 7 tablespoons of water. Whisk until you get a thick, paste-like consistency. It should hold peaks but still be spreadable. Add water by the teaspoon if it’s too stiff, or more powdered sugar if it’s too runny. You want something sort of like toothpaste for maximum sticking power.
Royal icing dries hard and creates a strong bond, which is why it works for gingerbread houses. Regular frosting stays soft and won’t hold weight. Don’t substitute buttercream here, as you need the structural properties of royal icing.
If I learned anything from this process, it’s to make more than you think you’ll need. Running out halfway through decorating is annoying and makes a sticky project even more messy. Extra icing can always become decorative snow around your finished house, and with the right consistency, it will create the perfect drip lines that mimic classic gingerbread houses.
Step 3: Cover the Frame with Cookies

Start with one wall of your foil-wrapped frame. Spread a generous layer of royal icing on the foil surface of the cookie, then press it onto the frame. The cookies should sit flush against the frame with icing squeezing out slightly around the edges.
Cookies don’t need to line up perfectly or create clean seams. Any gaps or irregularities can get hidden under decorations later.
Work your way around the frame, covering all sides. The roof can be trickier since you’re working at an angle, so use a little more icing here. If it squeezes out the sides, it will just look like a snowy roof. Apply icing to both the frame and the back of the cookie for extra hold, then press firmly. Hold it in place for around 15 seconds, and it should stay put.
Let each section set for a few minutes before moving to the next one. You don’t need to wait long, as royal icing starts gripping almost immediately. Just give it enough time that you’re not smearing your work when you rotate the house.
Step 4: Add Your Decorations

Your house should be solid now, and you can decorate without worrying about destroying your construction. Pipe icing along the roof edges and stick candy to the exterior to decorate. Create a door and window trim too, with icing or chocolate. I went the chocolate route, and it took a while to set because of the weight, so icing might be better than what I’ve done here.
Some people create elaborate candy landscapes with trees and snowmen. Others keep it simple with just icing details and a few strategic candies. I decided to keep my gingerbread house minimalist (partly because I was running out of icing, and partly because candy doesn’t last 5 minutes in my house). Whatever design you opt for is totally up to you.
You can also use cookie alternatives to get creative. Pretzel sticks make convincing logs for a log cabin effect if you’re covering your frame with them instead of graham crackers. Once you start looking at snacks as alternative building materials, options multiply quickly.
Spread icing on the board you’re using and cover it with shredded coconut or powdered sugar for snow, or just leave it white. This frames your house and makes the whole thing feel more complete.
Step 5: Enjoy!

And with that, your no-bake gingerbread house is done. It looks like a gingerbread house, but it required a fraction of the effort and none of the structural issues. Display it on your table or counter where people can appreciate it.
The house will last if you keep it somewhere dry and cool. Just keep it away from heat sources or humid areas. Also, keep in mind that other types of cookies will last differently when exposed to the air, so you may have to eat them sooner than usual (oh no!).
Next year I’m definitely using this method again, especially because the result is much more aesthetically pleasing than any gingerbread house I’ve made in the past. Never would I have attempted a massive double-story gingerbread house if I had to bake it myself. Maybe I’ll even attempt one of those whole gingerbread villages.