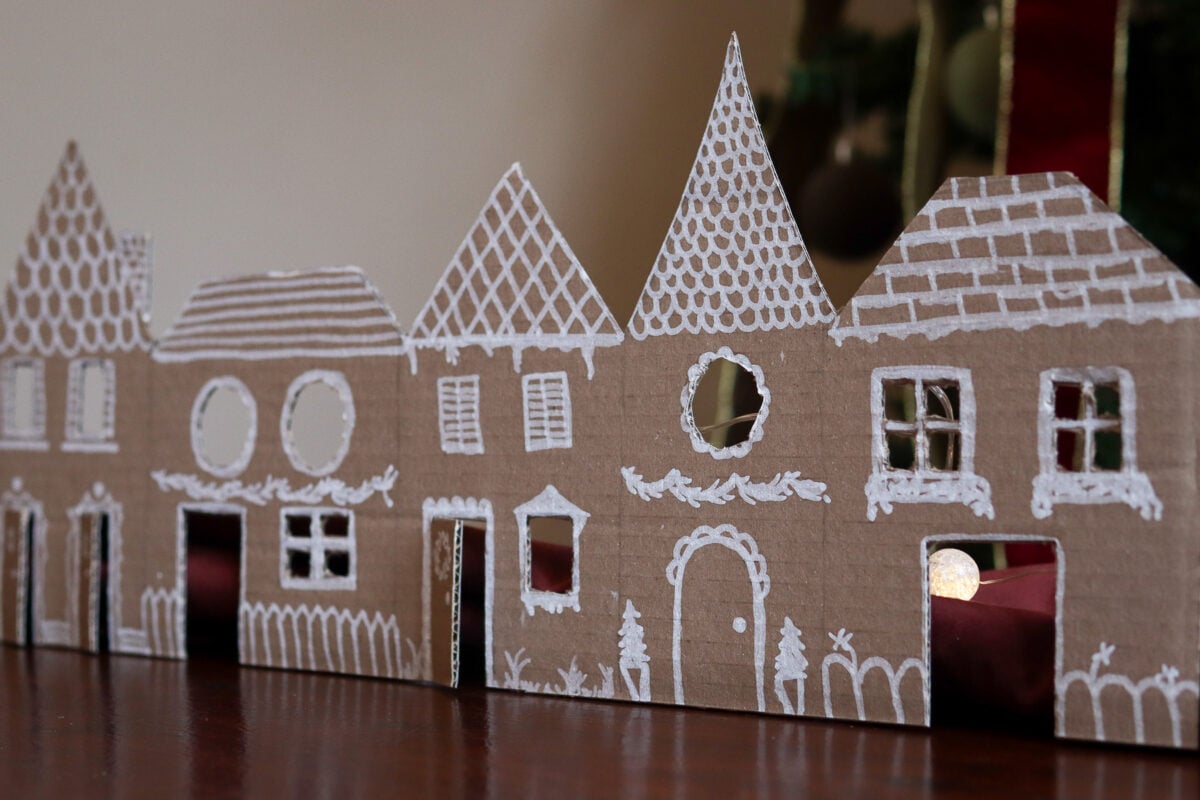
If you’re like me, you probably have a pile of Amazon boxes sitting in your garage or recycling bin right now. Instead of breaking them down and tossing them, you can transform that cardboard into something genuinely adorable for the holiday season: a miniature gingerbread village that glows from within.
For those who don’t have the time to bake real gingerbread houses, this craft makes décor that looks just like them, but with a fraction of the effort. The end result is neutral and minimalist decorations that you can dress up or down to match the look you’re going for.
You can make one simple house or an entire neighborhood of buildings if you prefer. The houses can be realistic or whimsical, tall or short, plain or elaborate. And because you’re working with free cardboard, there’s no pressure to make everything perfect. If you mess up, just grab another box and try again.
The whole project takes an afternoon if you’re making a small village, maybe a weekend if you want to go bigger. Most of that time is spent drawing details rather than construction, which makes it a relaxing activity you can do while watching holiday movies.
What You’ll Need

Start saving your cardboard boxes now if you haven’t already. Amazon boxes work perfectly, but any brown cardboard will do. The sturdier the better, so aim for boxes with thick walls rather than thin, flimsy ones. You’ll need enough to make however many buildings you want in your village (one box can usually yield two to three house shapes, depending on size).
A white ink pen is essential for this project. Regular markers don’t show up well on brown cardboard. You can also use white paint, but it’s far quicker to get the details done with a pen. Ink or gel pens specifically work best.
If you really want to make your gingerbread village pop, grab a bottle of puff paint in white to give your “icing” a little dimension.
For cutting, you’ll need an X-Acto knife or box cutter. While a box cutter will work in a pinch (it’s what I had to hand), for the most precise cuts, use an X-Acto knife and change the blade as necessary. Scissors can work for the outer shapes, but windows and doors require a precision blade. Make sure your blade is sharp, as dull blades make ragged cuts that you’ll definitely see once the houses are illuminated.

Styrofoam sheets form the base of your village. These are available at any craft store in large sheets, or you can purchase them here. The foam needs to be thick enough to support your cardboard houses standing upright, so 1″ or 2″ thick.
Finally, you’ll need lights to make your village glow. While this is optional, the soft glow of fairy lights makes a bigger impact on the finished look. Battery-operated LED tea lights work perfectly or fairy lights if you’re making a larger village.
Step 1: Draw Out Your Design

Before you cut anything, sketch your house design directly on the cardboard. Start with the basic shape: a simple rectangle with a triangular roof is classic gingerbread house territory. Draw this outline on a flat section of your cardboard box, making it whatever size feels right. For an entire village, group them all together, using different-sized houses to make each stand out.
Within that outline, sketch where your windows and doors will go.
This is where you can get creative. Try arched windows, round porthole windows, doors with decorative panels, or recreate your own neighborhood street by using other houses for inspiration. Just remember that you’ll need to cut these out, so don’t make them so small and intricate that cutting becomes impossible.
You can also sketch the decorative elements at this stage if you want a guide, though I usually save that for after cutting.
Step 2: Cut Out the Outline, Doors, and Windows

Using your craft knife, carefully cut along your outer outline first. Be sure to put something under the cardboard to protect surfaces like tables and countertops. Take your time here, as rushed cuts lead to wobbly edges that make your house look sloppy. If you’re using scissors for the outer cuts, that’s fine for straight edges, but it’s best to use the craft knife for curves and angles.
For windows and doors, you definitely need the craft knife. Pierce through the cardboard from the front, then carefully cut along your drawn lines. Windows and doors can be fully cut out to create openings, which is what you want if you’re going for that glowing effect.

Alternatively, you can cut just three sides of the door and fold it open slightly, which adds dimension and looks charming. Same with shutters. These small details make the houses feel more three-dimensional and interesting. Or you can keep them flat if you prefer a simple look.
Once everything is cut, erase away any visible pencil marks if they bother you. Some will get covered by your white pen decorations anyway, so don’t stress too much about perfect cleanup.
Step 3: Decorate with the Pen

Using your white pen, start adding details that mimic icing and candy decorations. The most obvious place to start is the roofline. Draw a wavy line along the edge to look like icing dripping down, and add bricks or rounded roof tiles for detail.
Around windows and doors, add decorative trim. Simple lines work fine, or you can get fancy with scalloped edges or zigzag patterns. Think about how royal icing looks on real gingerbread houses and try to replicate that. The white-on-brown contrast naturally gives you that icing-on-gingerbread appearance without any actual baking.
Add embellishments anywhere you want extra detail. You can draw snow on the roof, create window panes with crossed lines, or add wreaths on doors. There’s really no wrong way to do this. More detail looks impressive, but simpler designs have their own clean appeal. You could even add a tiny pipe cleaner wreath above each door.
If you want to add extras beyond just pen work, stick on sequins as lights, or attach small buttons as decorative elements. But honestly, the pen alone creates such a nice effect that additional embellishments aren’t necessary. I usually stick with just the white pen because it maintains that cohesive, silhouette quality.
Step 4: Glue to Foam Sheet

Your decorated cardboard house needs a way to stand upright, and that’s where the foam sheet comes in. Cut a strip of foam as long as the base of your house. Because I left some ‘doors’ open, I cut pieces to stick along the areas where they wouldn’t be visible. This strip will be glued to the back of your house to create a support that holds it at a 90-degree angle.
Apply hot glue along one edge of your foam strip, then press it firmly against the back of your cardboard house near the bottom edge. Hold it in place for about 30 seconds while the glue sets. The foam should stick straight out from the back of the house, creating an L-shape when viewed from the side.
Once the glue is fully cooled, your house should stand on its own when you place it on a flat surface. The foam base keeps it stable and prevents it from tipping over. If your house is particularly tall or top-heavy, you might want a wider foam base for extra stability.
You can either cut individual foam bases for each house or glue all your houses onto one large foam sheet to create a unified village display.
Step 5: Add Lights

The lighting is what takes this project to the next level. Place LED tea lights on the foam base directly behind each house. When you turn the lights on, they’ll shine through the cut-out windows and doors, making the houses look like they’re glowing from within. My pictures were taken during the day, so the effect is less visible, but at night they look adorable.
Since cardboard is flammable, you definitely don’t want to use regular candles for this. Battery-operated LED lights stay cool, which makes them perfect. You can also tape the lights down if you want them to stay in specific positions.
If you’re using string lights instead of individual tea lights, weave them through your village, tucking them behind houses strategically so the light shines through the windows. I also added some velvet fabric surrounding the lights. This works especially well if you’ve made multiple houses, so the string lights can illuminate several buildings at once.
The effect is best in low light or darkness. Set up your village somewhere you can enjoy it in the evening. When you turn off the overhead lights and let your cardboard village glow, it creates this cozy, nostalgic atmosphere that feels surprisingly special for something made from recycled boxes.
Add Layers

Once you’ve mastered the basic house, think about creating depth in your village by making buildings of different sizes and placing them at varying distances. Create a perspective that makes your village look more realistic and dimensional.
You can also create different types of buildings beyond just houses. A church with a tall steeple, a shop with a large storefront window, a barn, or even a clock tower all add variety and interest to your village.
Layering can also mean adding elements beyond buildings. Cut out simple tree shapes from cardboard and decorate them with a white pen to look like snow-covered evergreens. Make a cardboard fence by cutting out picket shapes and gluing them to a foam strip. Small touches like these make your village feel more complete.
Even a simple three-house setup looks charming when it’s glowing on your mantel next to the stockings. Start small and add more each year if you enjoy making them. The boxes aren’t going anywhere, so you’ll always have materials for expansion.