
Christmas crafts are one of my favorite parts of the holiday season. But I have to admit that they can often be time-consuming. It seems like crafts get more complex each year, requiring more tools and free time to get it right.
Now I’m not going to say these kinds of crafts aren’t worth it.
However, sometimes I want something quick and easy that doesn’t have tons of complicated steps or preparation time.
Not needing a bunch of materials to start is also a bonus. And it shouldn’t look like it was made quickly or cheaply, either.
That’s where this quick mini Christmas hat ornament shines. For starters, you only need two materials that you probably already have at home, and a pair of scissors. As long as you’re good with knots, each one shouldn’t take you more than 10 minutes to complete. And most importantly, they look absolutely adorable and have a bunch of uses.
This Christmas craft might be a little tricky for younger kids, as there are a lot of knots involved, but there are definitely steps they can help with. Or you can make the hats for them and let them choose how to decorate with them around the house.
What You’ll Need

As mentioned, only two materials are needed for these Christmas hat ornaments: old cardboard toilet rolls and yarn. One paper toilet roll can make several mini hats, so you don’t need to collect a lot before you start.
While you can also use twine or other string for this craft, yarn looks the most realistic and holds up the best. Pick your colors according to this year’s Christmas color scheme. I prefer sticking to neutrals to use them in any room, but classic red or green is always a great choice. Or mix colors in the same hat.
As these hats are small, one ball of yarn will make several hats.
You can also make slightly larger hats by crafting your own cardboard rings as a frame. From there, the process is exactly the same. But I think the tiny ones look the best anyway.
The only other thing you’ll need to get started is scissors. No glue is required here, as the knots will do the work for you. If you have a thinner yarn or string and want the mini Christmas hats to stand completely upright, some cotton wool is also helpful for filling.
Making Mini Christmas Hat Ornaments
Once you have your items gathered, you can get started with this easy DIY Christmas craft. While they don’t take long, making knot after knot can become tedious, so I recommend putting on a show or an audiobook in the background to keep you occupied.
Size and Cut the Toilet Roll

The first step in crafting your mini yarn Christmas hat ornaments is to cut the paper toilet roll to size. This is the frame that the yarn will be tied to and forms the bottom of the hat (the part that would be folded over when wearing a real wool hat).
As this is the bottom section of the hat, you don’t want to cut the pieces too big. Having a smaller base makes the mini hats more realistic and doesn’t affect the structure. I like to cut mine about a quarter of an inch thick. Thinner pieces also mean you can make more hats out of one toilet roll.
Once you’ve decided on the thickness, cut horizontally into the toilet roll, leaving you with a cardboard ring. If you’re making one or two, the measurements don’t have to be the same, but if you’re making several hats to display together (like on a garland), it’s best to keep the rings the same thickness for uniformity.
Cut Yarn to Size

Luckily, an empty toilet paper roll has a circumference of exactly 5.5″, which is the perfect length for this project. Wrap the yarn loosely around a toilet paper roll to create the desired number of pieces of string. For instance, if you want 30 pieces of string, wrap it 30 times. Remember, not too snug.
Now, using your scissors, cut in a straight line across the yarn. Ta-da! You now have 30 pieces of yarn that are all 5.5″ long in a matter of moments.
You need a lot of individual pieces to make a full-looking hat. I would aim for a minimum of 30 pieces, depending on the thickness of your yarn, to avoid any gaps.
Tie the Yarn to the Cardboard Frame

Now comes the bulk of the work: tying knots. Grab an individual piece of yarn and pull it through the cardboard ring until it’s folded in half (so the ends hanging from either side are an equal length. Then, tie a basic knot to attach the yarn to the ring, keeping the knot itself at the edge of the ring.
When you’re pulling, don’t tie the knots too tightly. Thin cardboard rings bend easily, and this will distort the shape of your hat. You only need enough pressure to secure the yarn in place.

Keep tying the pieces of yarn to the cardboard ring in the same manner until the cardboard isn’t visible anymore. You may need to shift the yarn along the ring closer together as you go to make sure it’s densely covered.
Gather and Tie the Excess

When the entire ring is covered, you should have something that almost looks like a jellyfish, with the extra pieces dangling off the covered ring. Next, you’re going to gather all those dangling extra pieces together at a single point.
When you do this, you’ll start to see the hat take shape. Decide where you want the top of the hat to be and make that your gathering point. You can judge here what point feels right to make the hats look the most realistic. It’s better to go too short than too long, as long yarn hats don’t look quite right.
Once you’ve decided on the right spot, take another piece of yarn and tie a tight knot around it to gather each piece as closely together as possible. Be careful when making your knot that you don’t move any pieces out of place, as they will stick out of the hat.
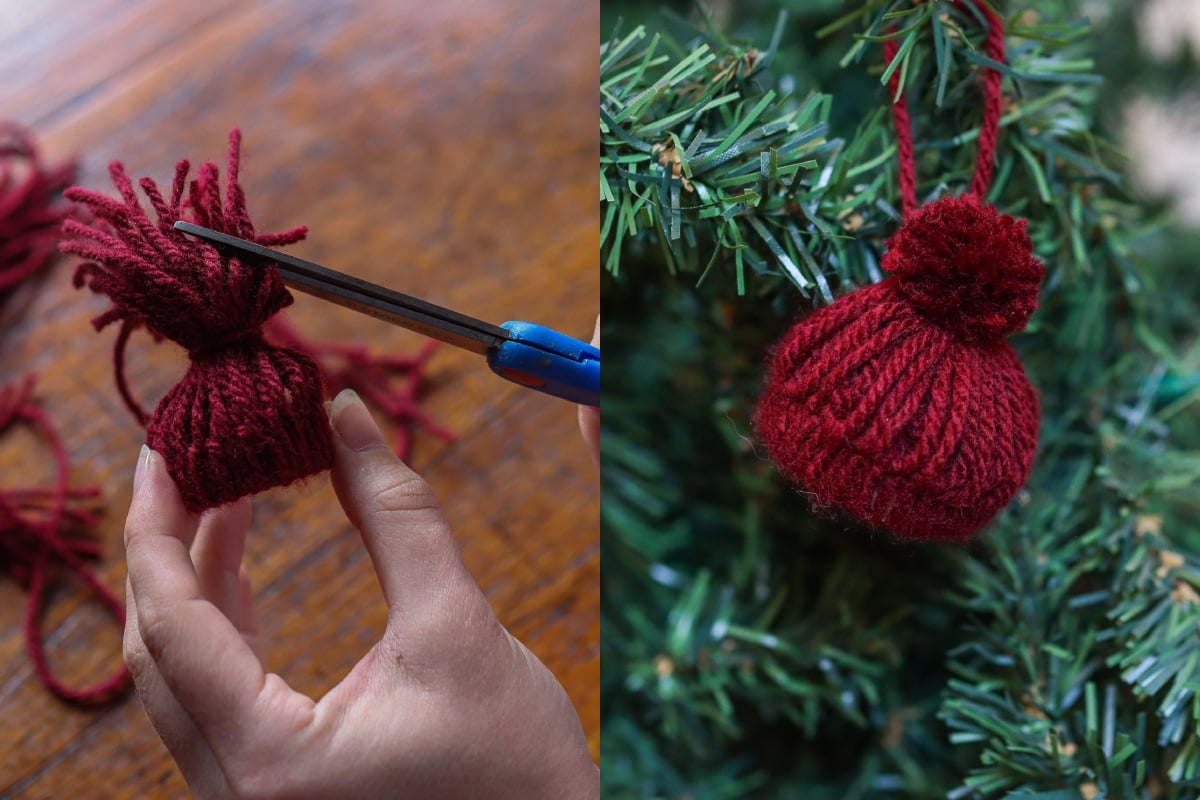
Trim the Ends

Finally, make your mini Christmas yarn hat look like a real one by trimming the top to create a pom-pom. Cut slowly in a circular motion all the way around to form a neat ball that covers up the knot underneath. Also, trim the ends of that final piece of yarn so there aren’t any pieces dangling off.
And that’s it! You now have an adorable mini Christmas hat to use in various ways.
Where to Use Them

Speaking of ways to use them, now is your chance to get creative. While you can just pop them as is around your house for some subtle Christmas décor, there’s a lot more you can do with a 10-minute mini Christmas hat.
For starters, they make great Christmas tree ornaments. If you want to hang them on tree branches, leave the piece of yarn you used to gather the hat together long and make a loop by tying a knot at the other end. They’ll easily hang from your Christmas tree this way.

I used these tiny hats in another craft with pine cones. If you have small enough pinecones, you can use these hats to create miniature gnome ornaments. For more details, you can find them here if you’d like to make a few.

If you have the patience to make multiple hats, you can string them together to make a cute garland. Tie them along a piece of string and add other trinkets or beads in between, depending on the aesthetic you’re going for.
The way I plan to use these this year is for Christmas table settings. Each guest will receive their own hat in their favorite color, accompanied by a small tag with their name on it to indicate their place setting. It’s the easiest party favor you can make.
As you can see, there are so many ways to use these that you’re bound to be making them with your family every year. I know I will be.