If you’re anything like me, you’ve been saving wine corks for years with the vague intention of doing something crafty with them someday. Well, I’m happy to tell you that day has arrived.
Wine corks are perfect for Christmas crafts.
They’re the right size for ornaments, have a nice rustic texture, and there’s something satisfying about finally using up all those corks you’ve been hoarding.
The projects I’m sharing here range from incredibly simple (you could finish some in under five minutes) to slightly more involved. None of them requires advanced crafting skills, though you’ll need a glue gun for a lot of them. (The Gorilla mini hot glue gun is awesome!)
A quick note before we start: these crafts work best with natural wine corks rather than the synthetic ones. Natural cork has a better texture and takes paint and glue more easily. It’s also easier to cut through, which is a step in a couple of these crafts. If you don’t have enough corks saved up, you can always buy them here.
Cork Reindeer
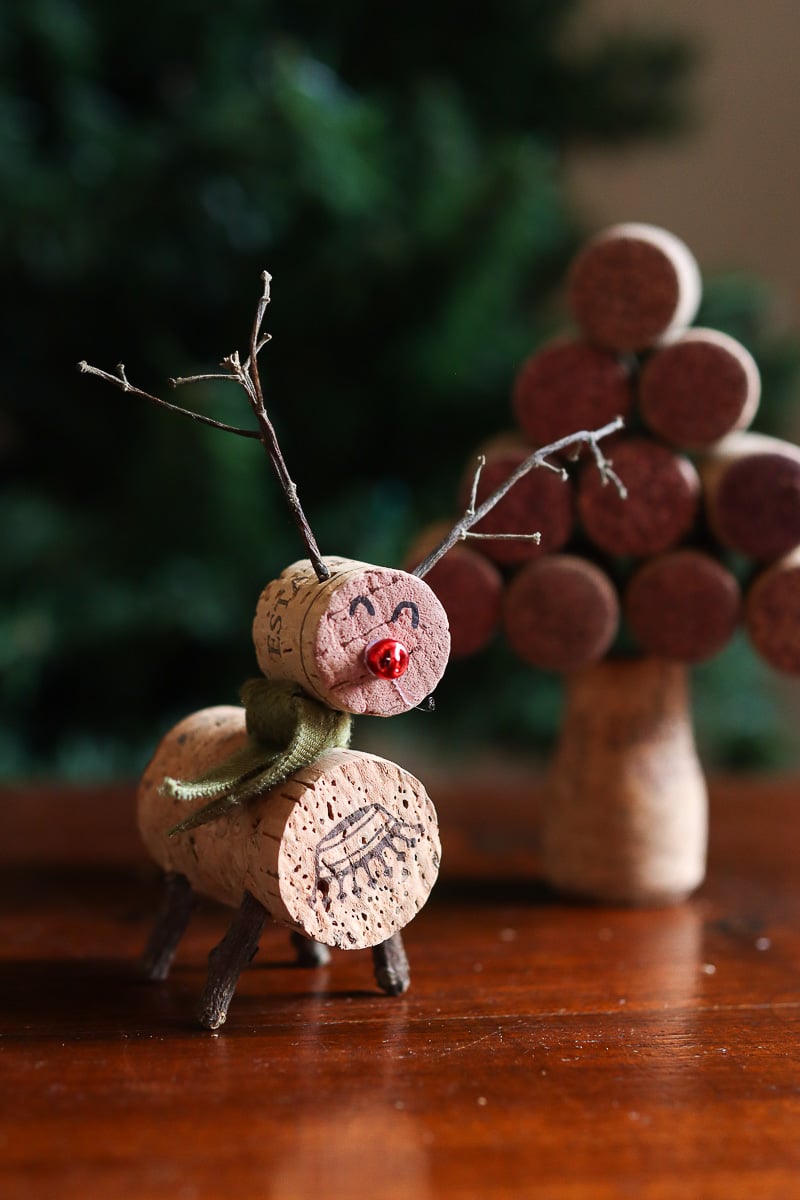
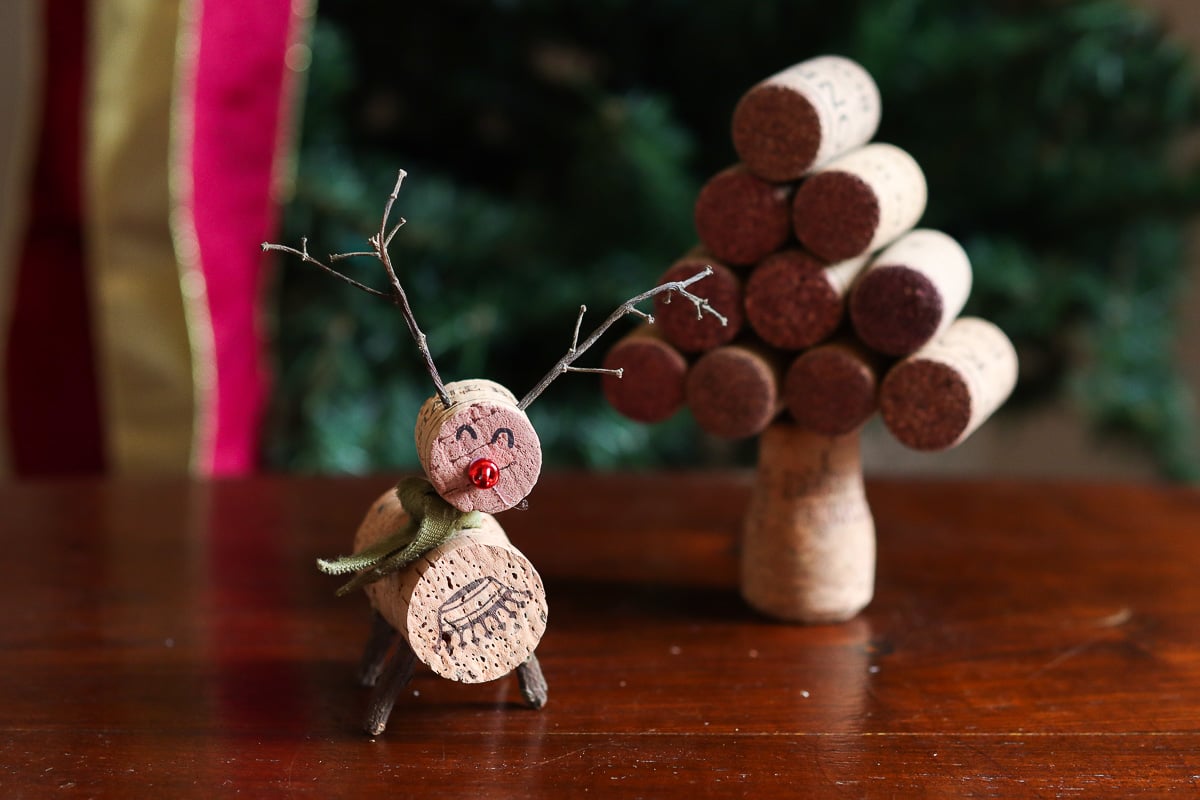
These cork reindeer are probably the most straightforward project on this list, and they turn out adorable every single time. The cork becomes the reindeer’s body and head, and you’ll add small twigs for antlers and legs, drawn-on eyes, and a red pom-pom or jingle bell for the nose. That’s really all there is to it.
First, glue two small twigs to the top of a half cork for antlers. They don’t need to match perfectly, which actually makes them look more natural. Draw eyes near the top front of the cork using a fine-tipped permanent marker, such as a Sharpie Pen. Then glue a small red pom-pom or jingle bell just below them for Rudolph’s nose.
Glue that to a full cork for the body, or connect them with a toothpick. For legs, glue on four small twigs at the bottom. I also added a cute little scarf made from a scrap of fabric for a pop of color.
If your legs are stable enough, you can leave these standing. For hanging them on the tree, use a jeweler’s eye screw and attach it to the top of the body.
These reindeer work well in groups. Make a whole herd in different sizes using various cork lengths. Kids can easily help with this one, and they’ll enjoy giving each reindeer its own personality.
Cork Elves
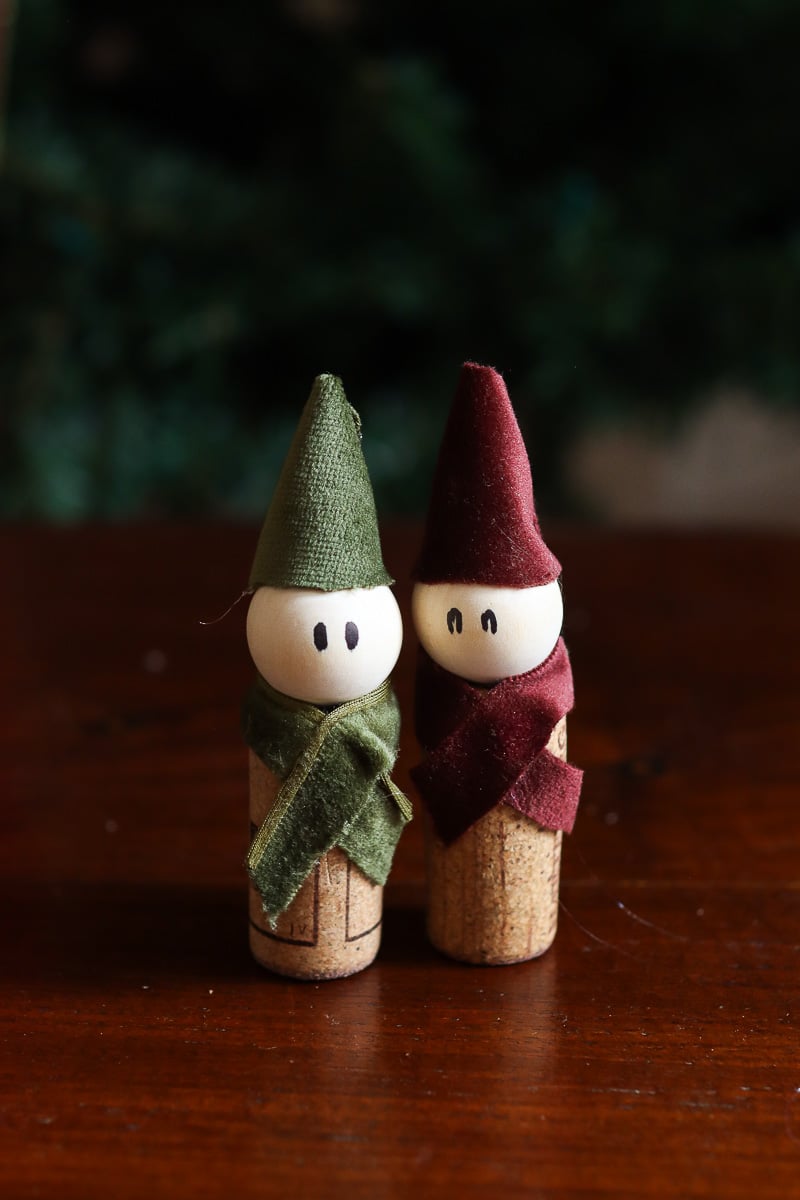
Cork elves also have more personality than you’d expect from something made of wine corks and wooden beads (which you can get here). The cork forms the body while a wooden bead becomes the head. You’ll need felt scraps for the hats and maybe a bit of yarn if you want to add hair or a scarf.
Glue a wooden bead on top of the cork, then paint a simple face with a fine-tipped marker or tiny paintbrush. Two dots for eyes and a curved line for a smile are all you need, but you can get more artistic if you want. Cut a triangular piece of felt and roll it into a cone shape for the hat, gluing it onto the bead. For hair, glue small tufts of yarn peeking out from under the hat.
You can dress up your elves further by painting the cork body green or red, or by adding a tiny felt scarf or belt. You can also paint little shoes at the bottom of the cork. How much you decorate them is totally up to you.
Cork Santas
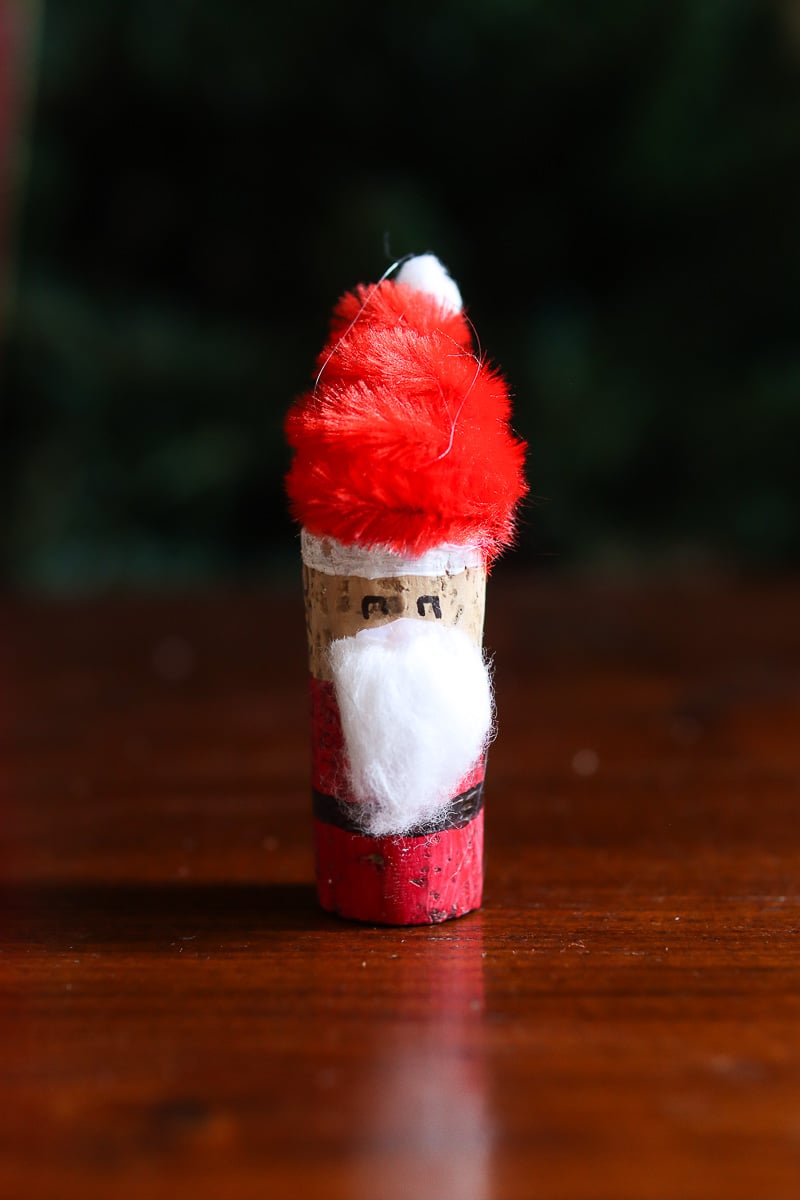
Cork Santas follow a similar concept to the elves, but with a different color scheme and some cotton ball additions. Paint the bottom two-thirds of your cork red for Santa’s suit, leaving the top third unpainted or painting it a flesh tone for his face. Once the paint dries, add a cotton beard that covers the lower portion of the face.
For the hat, either paint the very top of the cork red and add a white cotton ball pom-pom, or create a small felt hat like you did for the elves. Here, I made a quick hat from a red pipe cleaner. Add tiny black dots for eyes above the beard and maybe a little red dot for the nose. A thin strip of black felt or a painted black stripe around the middle creates a belt.
The tricky part is getting the proportions right so Santa doesn’t look oddly shaped. I’ve found that using slightly longer corks works better than short squat ones, since you need enough surface area for all the elements. If your Santa ends up looking more like a gnome, just go with it (gnomes are good for Christmas anyway).
Cork Angels
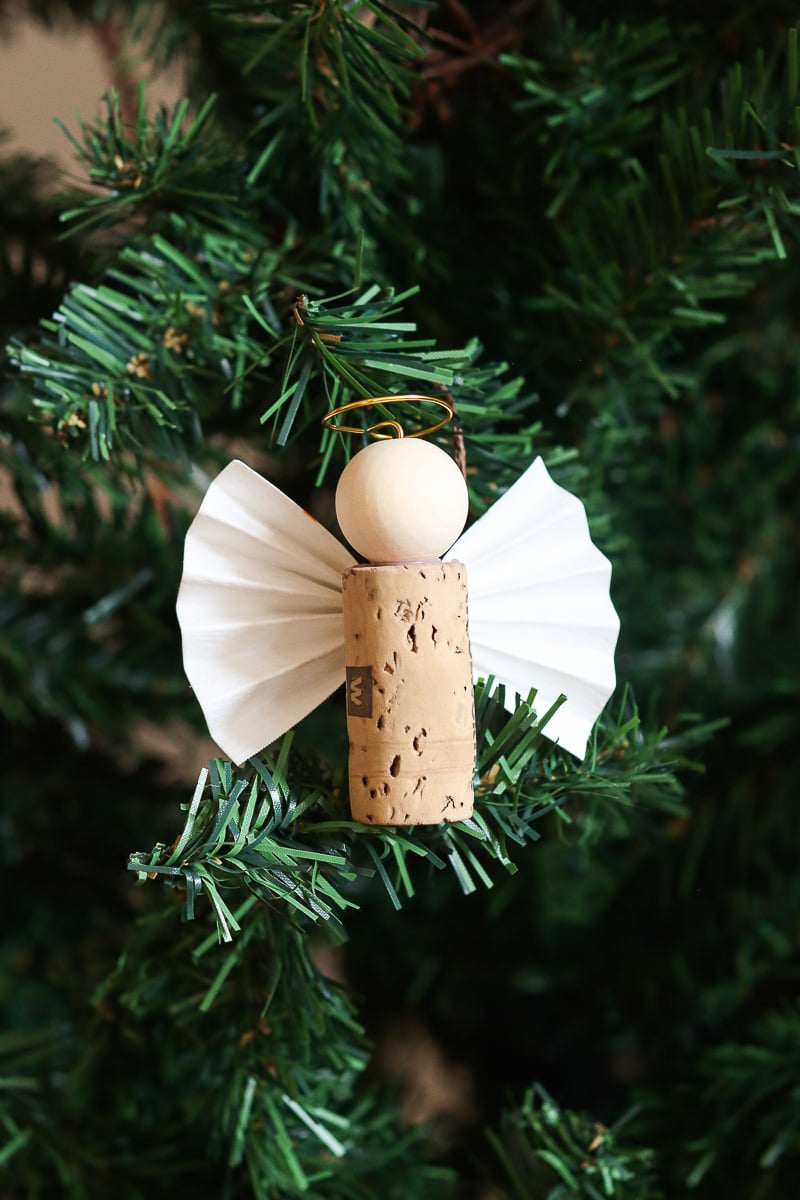
Angels made from corks have an elegant simplicity that works well on a tree. You’ll need corks, wooden beads for heads, and paper for the wings. Metallic gold or silver paper looks particularly nice, though plain white works too.
Start by gluing a wooden bead to the top of the cork for the head. For wings, fold a piece of paper accordion-style to create pleats, then pinch it in the middle and fan out both sides. Glue the pinched center to the back of the cork so the wings spread out on either side. You can draw a simple face on the bead if you want, or leave it blank for a more minimalist look.
A halo made from gold pipe cleaner or craft wire completes the angel. Just bend a small circle and glue it to the top of the head, or create a loop that attaches to the back so it hovers above. These angels have a vintage craft feel that fits well with retro or traditional Christmas décor. String several together to make a garland, or use them as tree toppers for small tabletop trees.
Stacked Snowman

This snowman requires a bit of chopping. Start with a small wine cork and a slightly larger one (like a champagne cork). Cut the ends off to make two rounds and paint both white.
After the paint dries, add details: buttons down the front made from small beads or painted dots, pipe cleaner arms stuck into the sides, and a face on the top section. A small strip of fabric or a pipe cleaner becomes a scarf wrapped around where the two sections meet. Glue the two rounds together or use a toothpick to connect both sides.
Glue a small loop of twine to hang these snowmen from your Christmas tree. If you want them to stand on their own, slice part of the bottom section to create a flat surface.
Cork Tree
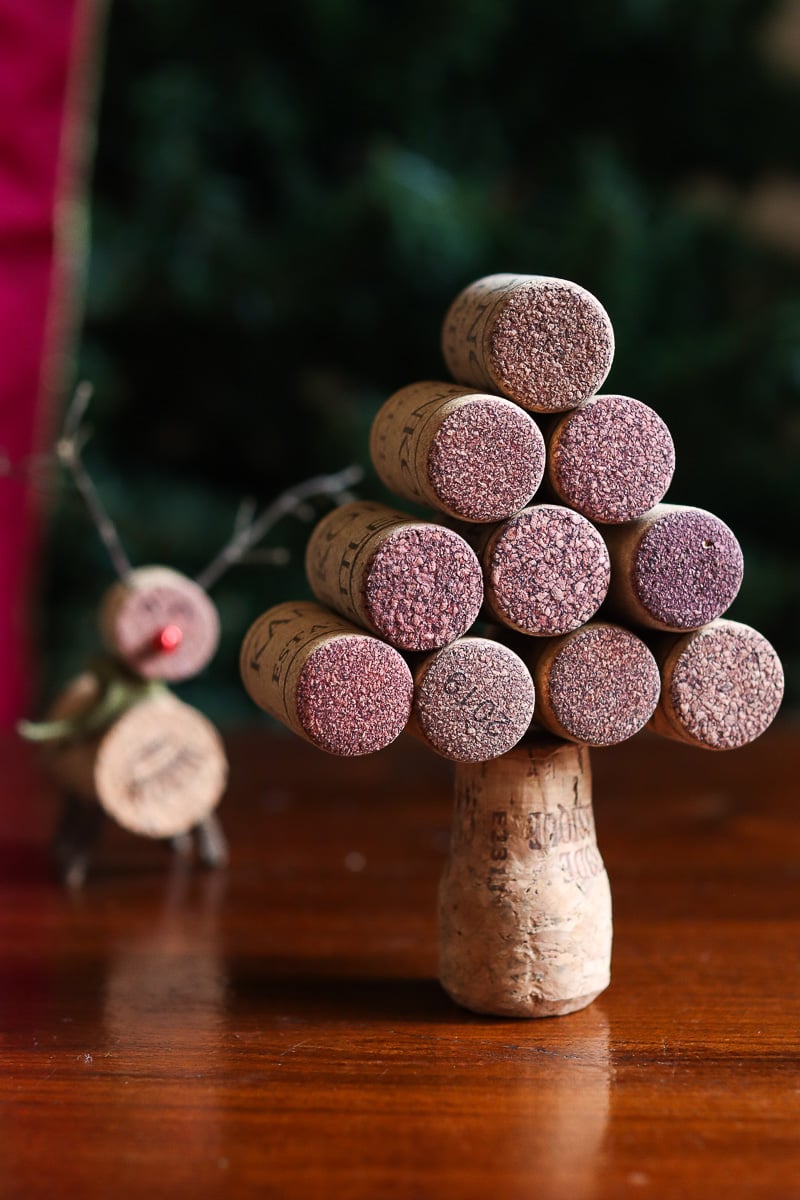
A cork tree involves gluing multiple corks together in a cone shape, which sounds complicated but is actually quite meditative once you get going. You’ll need a decent number of corks for this (at least 10, depending on how large you want your tree).
Start with a base layer of corks arranged in a row, all standing horizontally and glued together. For the next layer, use fewer corks arranged in a smaller row on top of the first, and keep going until you reach a single cork at the top. The tree naturally tapers as you work your way up. Then, add one final cork to the bottom for the trunk of the tree.
You can leave the corks their natural color for a rustic look (like I did here), or paint them green. Small embellishments, such as tiny beads glued on as ornaments or a mini star at the top, add festive touches. These cork trees are surprisingly sturdy once the glue fully sets, and they work well as centerpieces or mantel decorations. The cylindrical shape of the corks creates a nice texture and dimension that flat materials can’t replicate.
Snowflake Ornaments
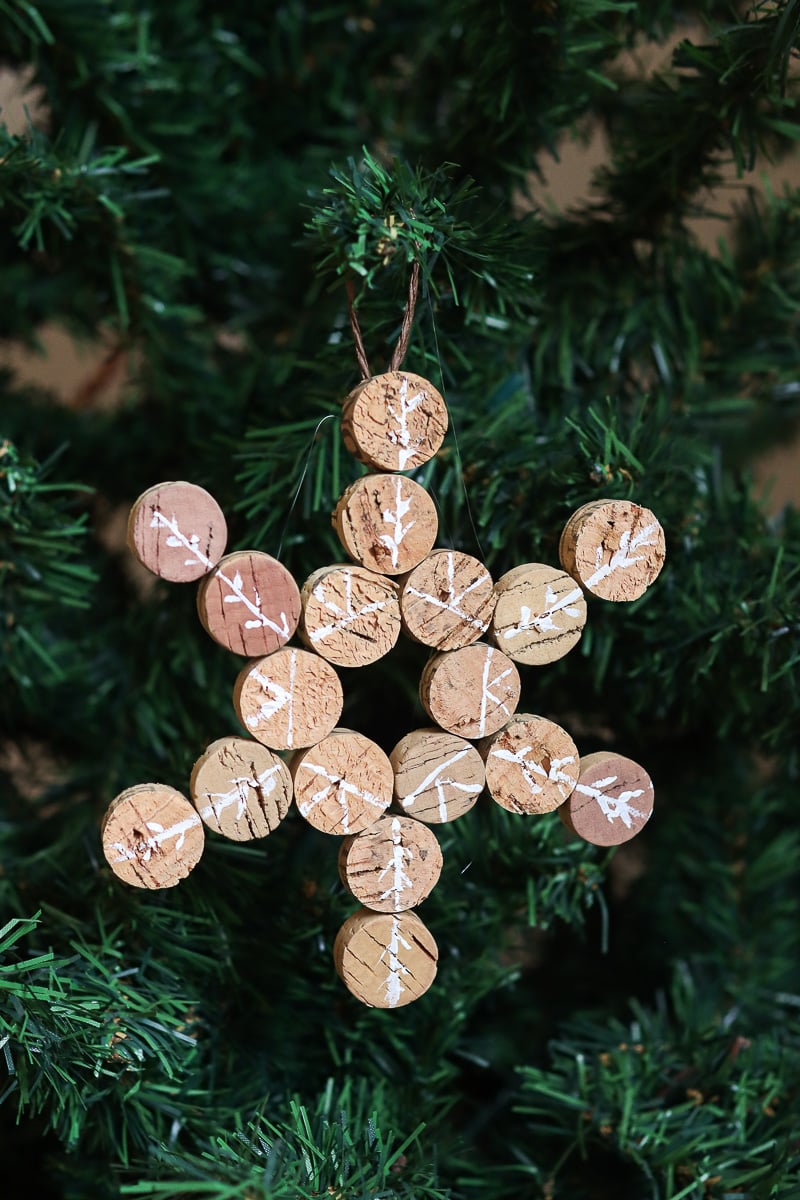
Snowflake ornaments made from sliced corks are more delicate-looking than you’d expect from such a chunky material. Cut several corks into pieces (you’ll need 18 pieces for each snowflake). A sharp knife works for this, and it’s definitely an adult-only step.
Arrange the cork pieces in a snowflake pattern with all the cut sides facing up, meeting at a circle in the center like spokes on a wheel. Glue them together where they meet in the middle, applying glue generously to create a strong bond. Once dry, you can paint them white or silver, or leave them natural and add glitter to the edges.
These snowflakes are surprisingly sturdy despite their open design. Thread twine around one of the outer points for hanging, or glue them flat onto packages as unique gift toppers. The cork pieces catch light in interesting ways, creating small shadows and highlights that make them more visually interesting.
Cork Stars
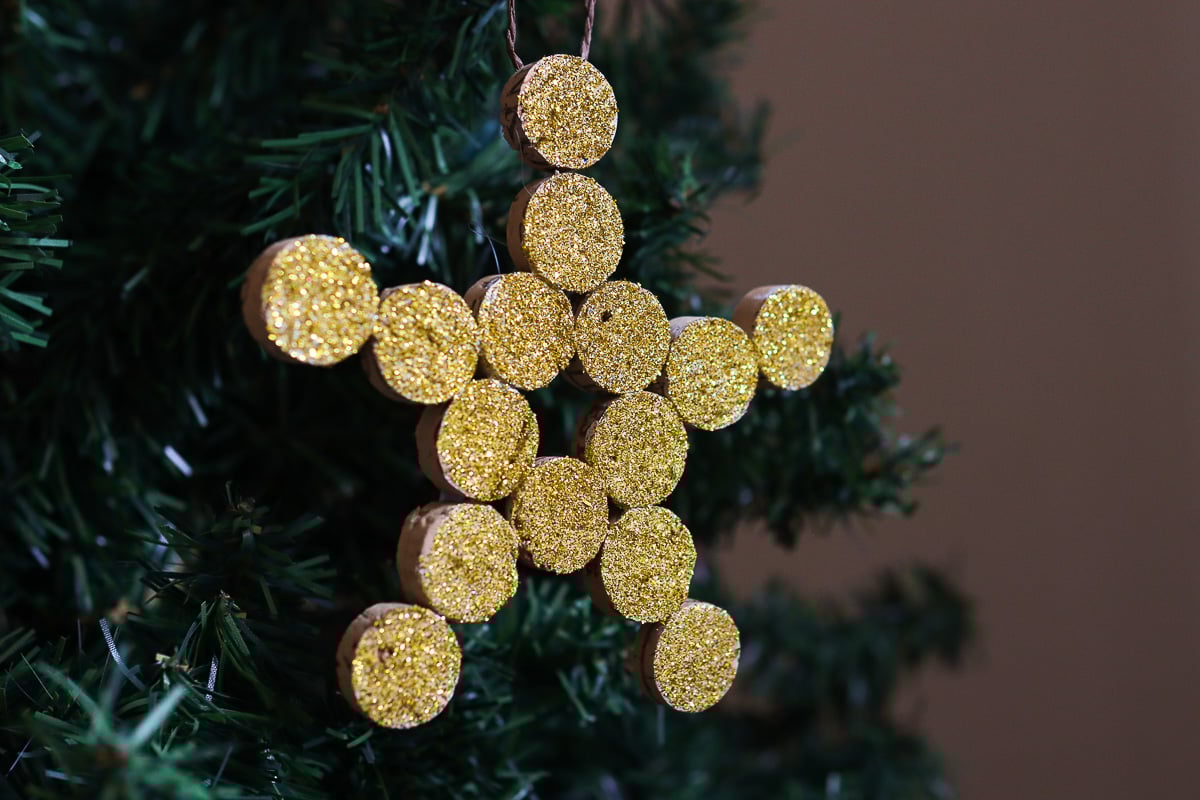
Cork stars follow the same process, but with fewer pieces. Cut corks into slices and arrange them in a five-pointed star pattern, with a cork round positioned at the end of each point.
Glue the cork rounds together so the star holds its shape. Paint the visible part of the cork rounds gold, silver, or leave them natural. I added glitter to mine for some extra sparkle.
The negative space between the cork rounds gives these stars a modern, geometric feel that works well with contemporary décor. They’re lightweight enough to hang from thin ribbons, and you can make them in various sizes by adjusting the size of the star.
Mini Christmas Cork Trees
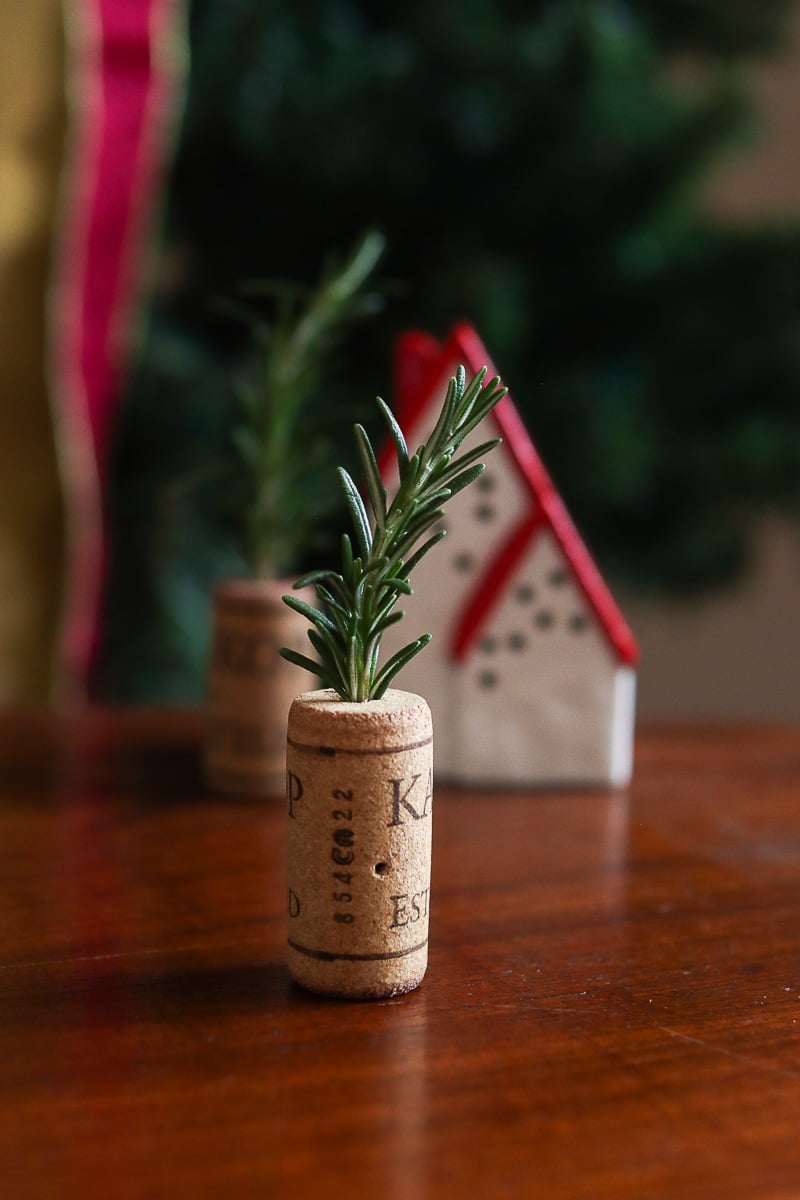
These might be my favorite project of the bunch because they combine corks with actual greenery (it’s also the easiest craft on the list). Each mini tree uses a single cork as its base (or trunk) and a small sprig of rosemary or pine as the tree itself. The contrast between the neutral cork and the fresh green foliage is really appealing.
Make a small hole in the center of the top of the cork. just deep enough to hold your greenery sprig securely. If you don’t have a drill, you can carefully make a hole with a skewer or nail. Insert your rosemary or pine sprig into the hole, adding a dab of glue if needed to hold it in place.
The cork keeps the sprig standing upright and provides a weighted base, preventing it from tipping over. These mini trees look charming scattered across a dining table or lined up on a windowsill. The greenery stays fresh for about a week before it starts to dry out, but even when dried, it still looks good and smells wonderful.
Whether you make just one of these projects or try all nine, you’ll end up with decorations that feel personal and handmade in the best possible way.